Six optimization tips to get more YouTube views
YouTube is known for its entertainment value: on YouTube, you can find a video for everything. However, the popular platform is more than a source of entertainment. YouTube has become the second largest search engine behind Google itself. Processing over 3 billion searches a month, YouTube search is used more than Bing, Yahoo, AOL and Ask.com combined.
As a result, whether you’re optimizing a brand’s or your own channel, it is important to take advantage of this platform. Here are some tips and tricks that will improve your YouTube SEO that will help your videos get more views, and help your channel thrive. I will be using my own personal YouTube channel as an example throughout this post as well as other popular channels.
1. Craft the perfect video title
Your video’s title is like a page’s HTML title: the title of your YouTube video informs the YouTube community what your video is about and what viewers will learn from it. As a result, this is an important place to incorporate your target keyword or phrase not only to encourage users to watch your video but also to help your video rank on YouTube.com and in organic search. The first thing to do is do keyword research to find the best keyword(s) for your title; you can do this by using the following tools:
- YouTube’s autocomplete
- KeywordTool.io/YouTube
- Google Keyword Planner
- SEMRush.com
- Moz Keyword Explorer
Let’s look at some examples from my channel:
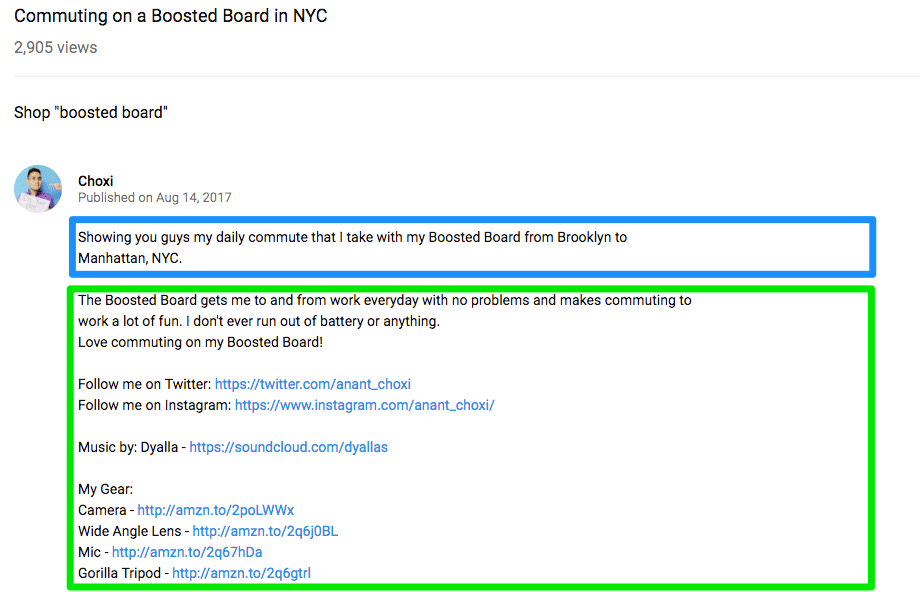
Bad: “Snow for Dayzzzz”

This video is a vlog about my family’s first day in Iceland. I don’t know what I was thinking for this title:
- It’s not compelling
- It does not describe what my video is about
- It contains “Dayzzzz” which is not at all a commonly-searched term
If I were to change this video’s title, I would try to incorporate keywords and better convey its content. For example, “Snow day in Iceland” would be better because it describes what the viewers will see in my video and contains stronger keywords such as “Iceland” and “Snow Day.” (While this video won’t rank for these key terms these are more appropriate key terms for the video and is more likely to capture viewers for Icelandic tourism videos.)
Better: “DJI Spark First Impressions!”
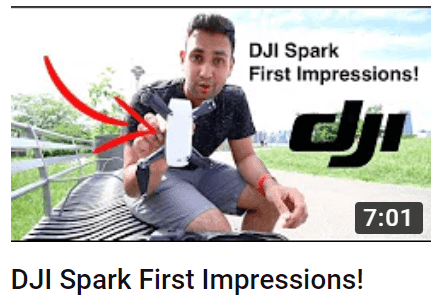
This video is where I get my first drone, the DJI Spark. In this video, I talk about my first drone and take it for its first flight. Here’s what I did well with this title:
- I used a very common phrase on YouTube, “first impression”.
- I also did incorporate some good keywords that will make finding my video very easy. Using keywords such as “DJI” and “DJI Spark” are highly searched terms.
However, this is still not the best title to have. To make this more compelling, I should have titled this video with a question such as, “Is the DJI Spark Worth it?” This title would be more effective because:
- It’s backed by keyword research with more than 50 average monthly searches (as opposed to my current title).
- In a question format, it is implied that I am answering a common question which may encourage potential viewers to watch.
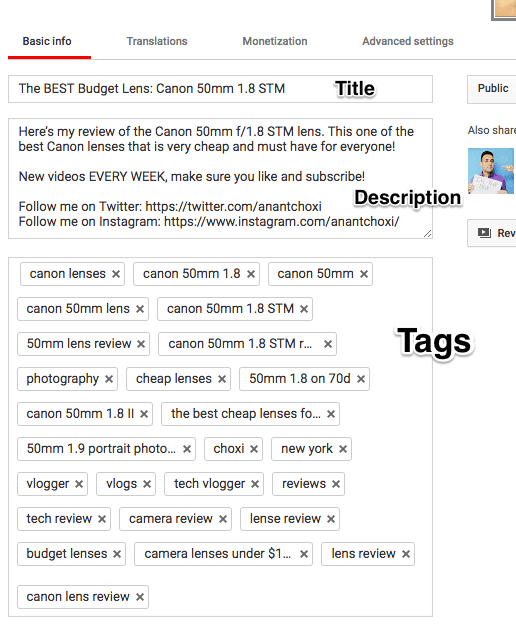
Best: “The BEST Budget Lens: Canon 50mm 1.8 STM”
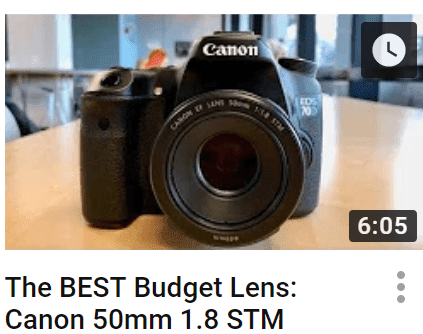
In this video, I do a review on the Canon 50mm lens. This is why it is my strongest video title:
- It includes keywords such as, “Canon”, “50mm” “Budget Lens”,
- It includes a superlative “BEST” which targets viewers who are actively searching for camera lenses that are cheap.
- It provides context, before clicking on the video the viewers will know that they will learn why this is the best lens they can buy on a budget.
This should help you get the ball rolling when it comes to thinking and formulating a title for your new video.
Pro tip? Keep your titles under 70 characters: while YouTube allows you to craft titles up to 100 characters, you should aim to keep your video titles short particularly for how they’ll appear in Google SERPS – Google currently truncates titles at around 66 characters.
2. Select compelling thumbnail images
Video thumbnails are not a ranking factor. They are however an opportunity to compel viewers to watch your video, by providing them with a snapshot of what your video entails.
Second to a video’s title, thumbnails are one the first things a prospective viewer sees when browsing video content. And since everyone’s goal is to encourage more people to watch your videos, it’s important to make sure your video thumbnails are representative of your video content and as captivating as possible.
To start off, I do not recommend using YouTube’s thumbnail generator. Your best bet when selecting a video thumbnail is to create and upload your own. Here’s how to pick or create an ideal video thumbnail:
- Watch your video, and select the most visually engaging section of the video.
- Make sure this video segment is representative of your video’s title.
- Make sure your freeze frame has one central focal point, and a simple color palette to avoid distracting viewers.
- Take a screenshot of this video frame.
- Make sure your image follows YouTube’s rules:
- 1280 x 720 pixels, 16:9 ratio
- Under 2MB
- You can use a .JPG, .GIF, .BMP, or .PNG
Here are some examples of good and bad thumbnails:
Bad  | Better  | Best  | |
| Is thumbnail good quality and in focus? | ✗ | ✓ | ✓ |
| Does it have the right dimensions? | ✓ | ✗ | ✓ |
| Is the thumbnail relevant to its video title? | ✗ | ✓ | ✓ |
| Is the thumbnail compelling? | ✗ | ✓ | ✓ |
You can add a text overlay (like “Version 2.3 Test/Review 40% More Torque?” in my example below), or symbolic annotations (think: arrows, dollar signs or exclamation points) to your thumbnails, but you should use overlays like these sparingly to avoid “cluttering” your thumbnail image.
Using branding and logos are a good idea as well, especially if your brand has a recognizable logo. Superimposing text on video thumbnails is very common, but entirely optional. Here are some examples of good thumbnails that meet our criteria above that also have some text or annotations:
| Without Text/Annotations | With Text/Annotations |
 |  |
 |  |
From the thumbnail examples above, you can see the difference of adding text overlay and symbolic annotations. Adding these to your thumbnail is a judgement call. The goal of a thumbnail is to be eye-catching and compelling to the potential viewer. If you believe that adding text and annotations will help you reach that goal, then you should go ahead and do it. But use your best judgment: don’t overwhelm your prospective audience with excessive text or annotations.
3. Make use of the first 125 characters in descriptions
Video descriptions are kind of like a webpage’s meta description: they provide some additional information about the content of the video. While users can see the full video description once they have navigated to the video’s page, the first 125 characters (or so) is what viewers will see as the “meta description” on search results from Google and YouTube. This first couple of lines help YouTube (and Google) determine what your video is about. However, everything after the first few lines is purely for the viewer.

The picture above from YouTube’s Creator Academy shows which parts of the description are pulled from YouTube video list pages and SERPs (blue area) and which part is for the viewer (green area).
Here’s how you should craft your video descriptions:
Blue area
Write a brief description of your video. Be sure to use a primary keyword (or query) in this area and expand upon what you viewer should expect to see and/or learn from this video.
Green area
In this area, YouTube says that there are “infinite ways” to organize and use this space. Since this section of the description is strictly for viewers, it should provide relevant information to augment their experience and reinforce your channel’s brand.
- Links to any mentioned/related products, articles, or featured personalities and/or companies.
- Calls to action for viewers, such as:
- Asking viewers to answer a question, and generate engagement(“Are you planning on getting the iPhone X? Leave a comment below and share why!”)
- Encouraging viewers to like your video and subscribe to your channel
- Calling upon your followers to RSVP to an event, or donate to a cause
- A signature for your channel – you should include this on every YouTube video you upload. These should include:
- Your personal, or company’s social profiles (Twitter, Instagram, Facebook, etc.)
- Related links (videos, blog post, product page etc.)
- Company/personal website
Below is an example from one of my videos where I follow the Blue/Green description format.
4. Leverage tags to make videos easier to find
Tags are essentially additional keywords you can associate with your video. This helps YouTube make your video easier to find for users and add additional context to what your video contains.There is no limit to how many tags you can put on a video.
Even though the sky is the limit with tags, you should make sure to:
- Choose tags that describe your video, do some keyword research (use research tools mentioned above).
- These can the be the same keywords you used for your title and description, but be sure to include more!
- Do
- Add as many tags as possible; there is no limit
- Use keyword research tools (mentioned above) to find any primary or secondary keywords
- Use relevant keywords
- Don’t
- Set random keywords just because they are popular
Example of tags used for one of my videos:
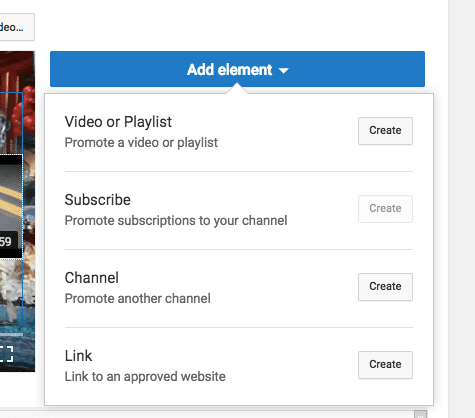
5. Use video cards to engage with viewers
Video cards are a good way of engaging your viewers while they are watching the video. They can set up to appear at specific times in the video and live under the ℹbutton at the top right of the video. You can add up to five different video cards throughout your video.
Types:
- Video/Playlist: suggest a video/playlist to the viewer
- Channel: promote another channel
- Donation: feature a nonprofit or cause for the viewers to donate to
- Poll: viewers can participate in a poll (good for engagement)
- Link: link to a website
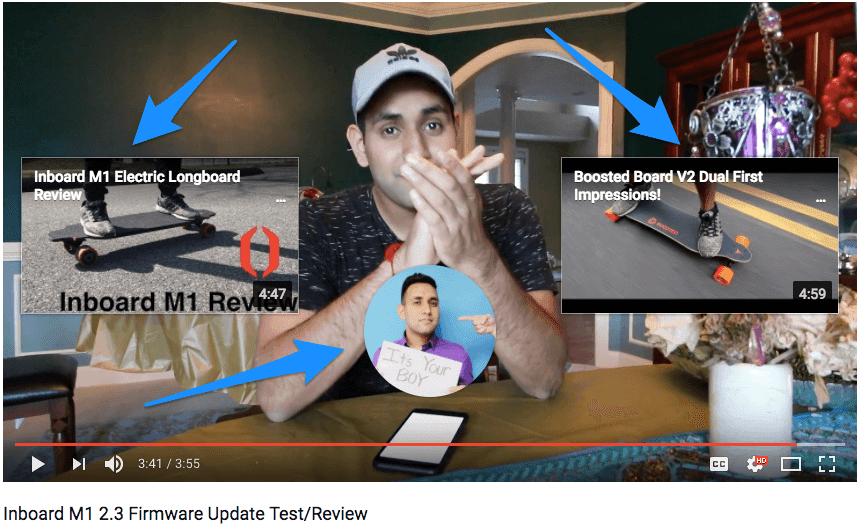
This is how video cards will show when the viewer pulls out the menu:
Video cards are a great way to increase engagement on your video. One of my favorite things to do is mention previous videos I have made in a current video, and then I place a video card of the video I mention it in the exact time I say it in the current video. By doing this, it makes it easy for the viewer to quickly click and watch my other video as well. Any cards made in the video will again, live under the ℹbutton for the viewers to see.
Video cards are quick and easy to set up. To do so:
- Go to your Creator Studio and click “Video Manager”.
- Click ‘Edit’ on the video you want to add cards to, then click ‘Cards’ on the top menu.
- Once you click on ‘add card’ and choose the type you want, you can then click and drag the card onto the progress bar.
6. Encourage users to view more content using end screens
End screens are a great way engaging with your viewers at the end of your video. End screens do a great job of encouraging viewers to click on another video and any other type of link(s) you provide. The goal here is to keep viewers on your channel, watching your videos or bring them with any additional information related to the video they just saw. With end screens, you can make this very easy for them.
There are four types of end screens:
- Video/Playlist: Promote a video or playlist
- “Most recent upload” – Attach the most recent uploaded video from your channel
- “Best for viewer” – Let YouTube decide which video the viewer may enjoy
- “Choose a video or playlist” – You can select which video/playlist to attach that may interest the viewer
- Subscribe Button: Create a button for viewers to subscribe to your channel
- Channel Button: Create a button to promote another channel
- Link Button: Create a link to an approved website
End screen templates
YouTube has a variety of end screen templates to choose from that will help you create them faster. Depending on who are you and what type of end screens you want to use, there are different templates for everyone.
For example, if you are doing this for your personal YouTube Channel I recommend using the “2 Videos | 1 Subscribe” template. You should set one of the videos to be “Best for viewer” and set the other to be “Most recent upload.” (Doesn’t matter which is which).
However, if you are a business or organization etc. I recommend using the “1 Video | 1 Subscribe | 1 Link” template. For the video I recommend selecting the “best for viewer” option, this will allow YouTube to choose the best video from your channel for the viewer to watch next. For the link, I recommend setting a link to external sites, like a custom page, blog post or product link pertaining to the topic of the video. Another thing to remember is that you are free to move the end screen buttons anywhere you want in your video.
How I set my end screens using the “2 Videos | 1 Subscribe” template.
I hope you guys were able to learn from this post. YouTube is great space, not only for individual people but companies/brands as well. It is important to know how to reach and build your audience on the platform. If you have any questions or comments feel free to tweet me.